requently aske
uestion
General Questions
What shapes and lengths do we offer?
Shapes: Round, Almond, and Square. Each of these shapes can also be purchased in Extra-Short, Short, or Medium length.


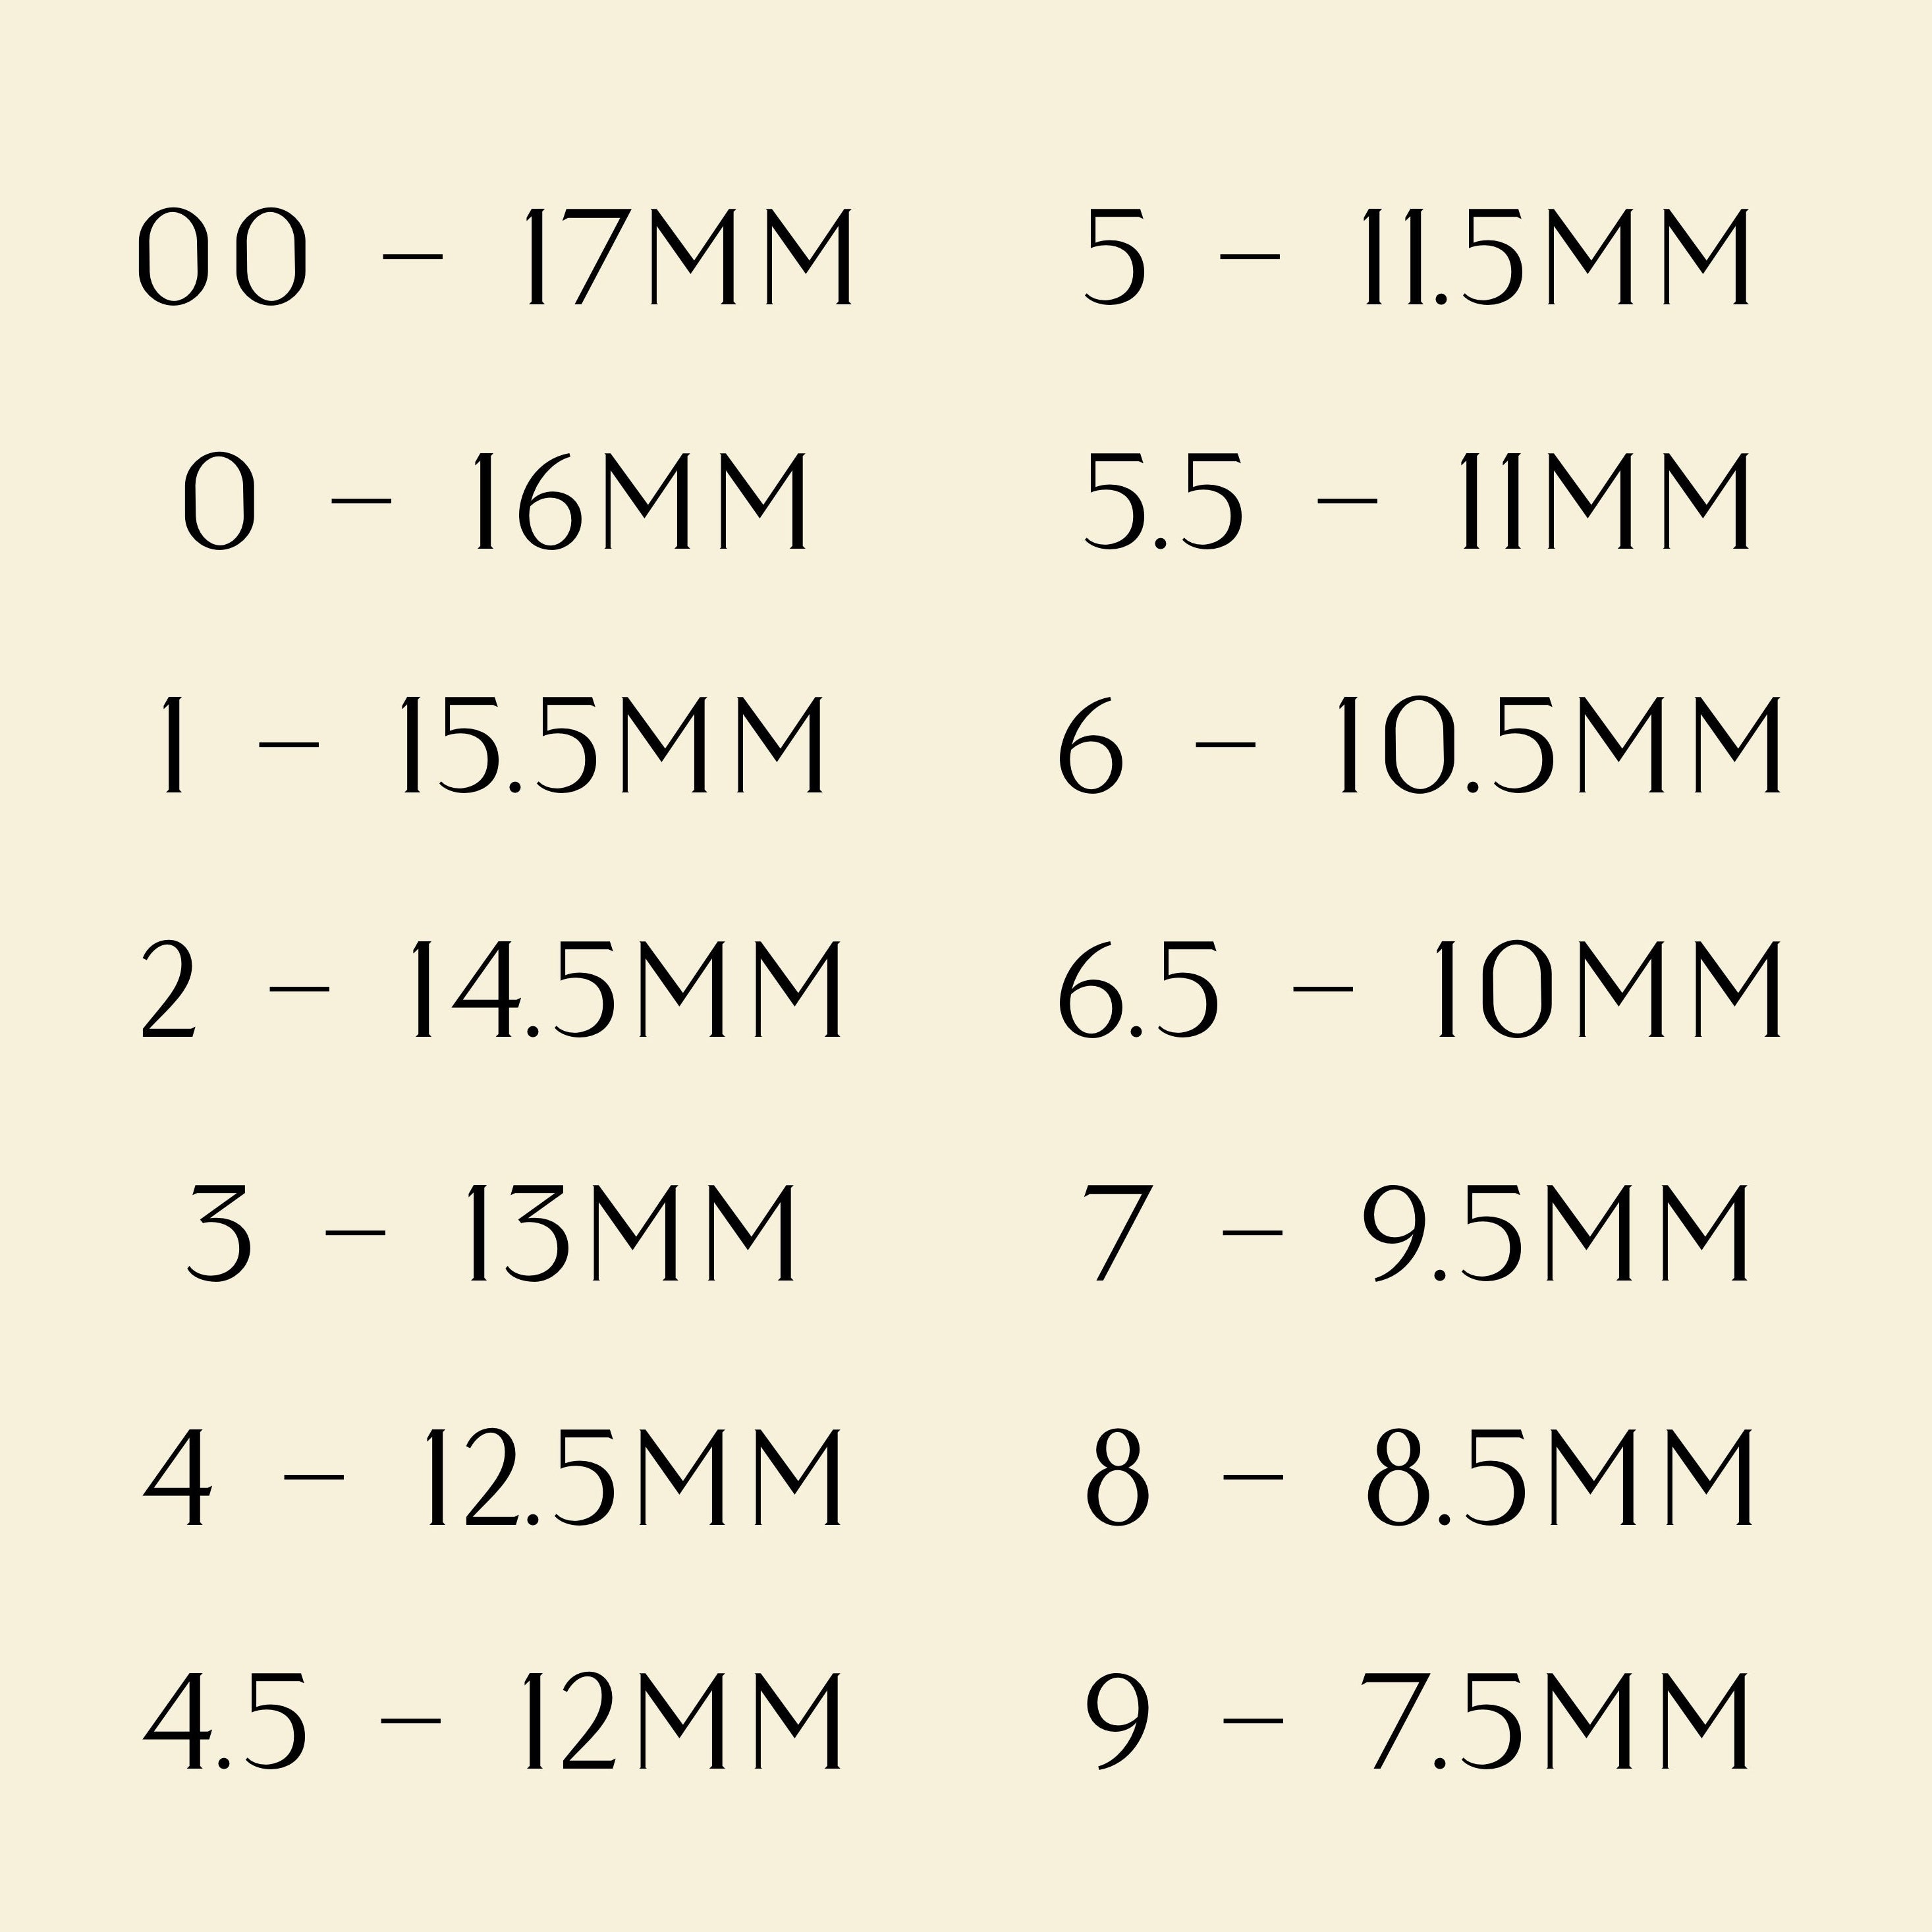
How do I find my nail size?
Option 1: The recommended and easiest way to find the correct size for your nails is to purchase our sizing kit. The kit provides you with all 14 tip sizes. From there you follow the instructions to find your individual nail sizes and then correspond them to the chart.
Option 2: Measure your nails. Although measuring your nails can be the quicker option, please be aware that there is more room for error. which in turn leads to the wrong nail sizes being ordered.
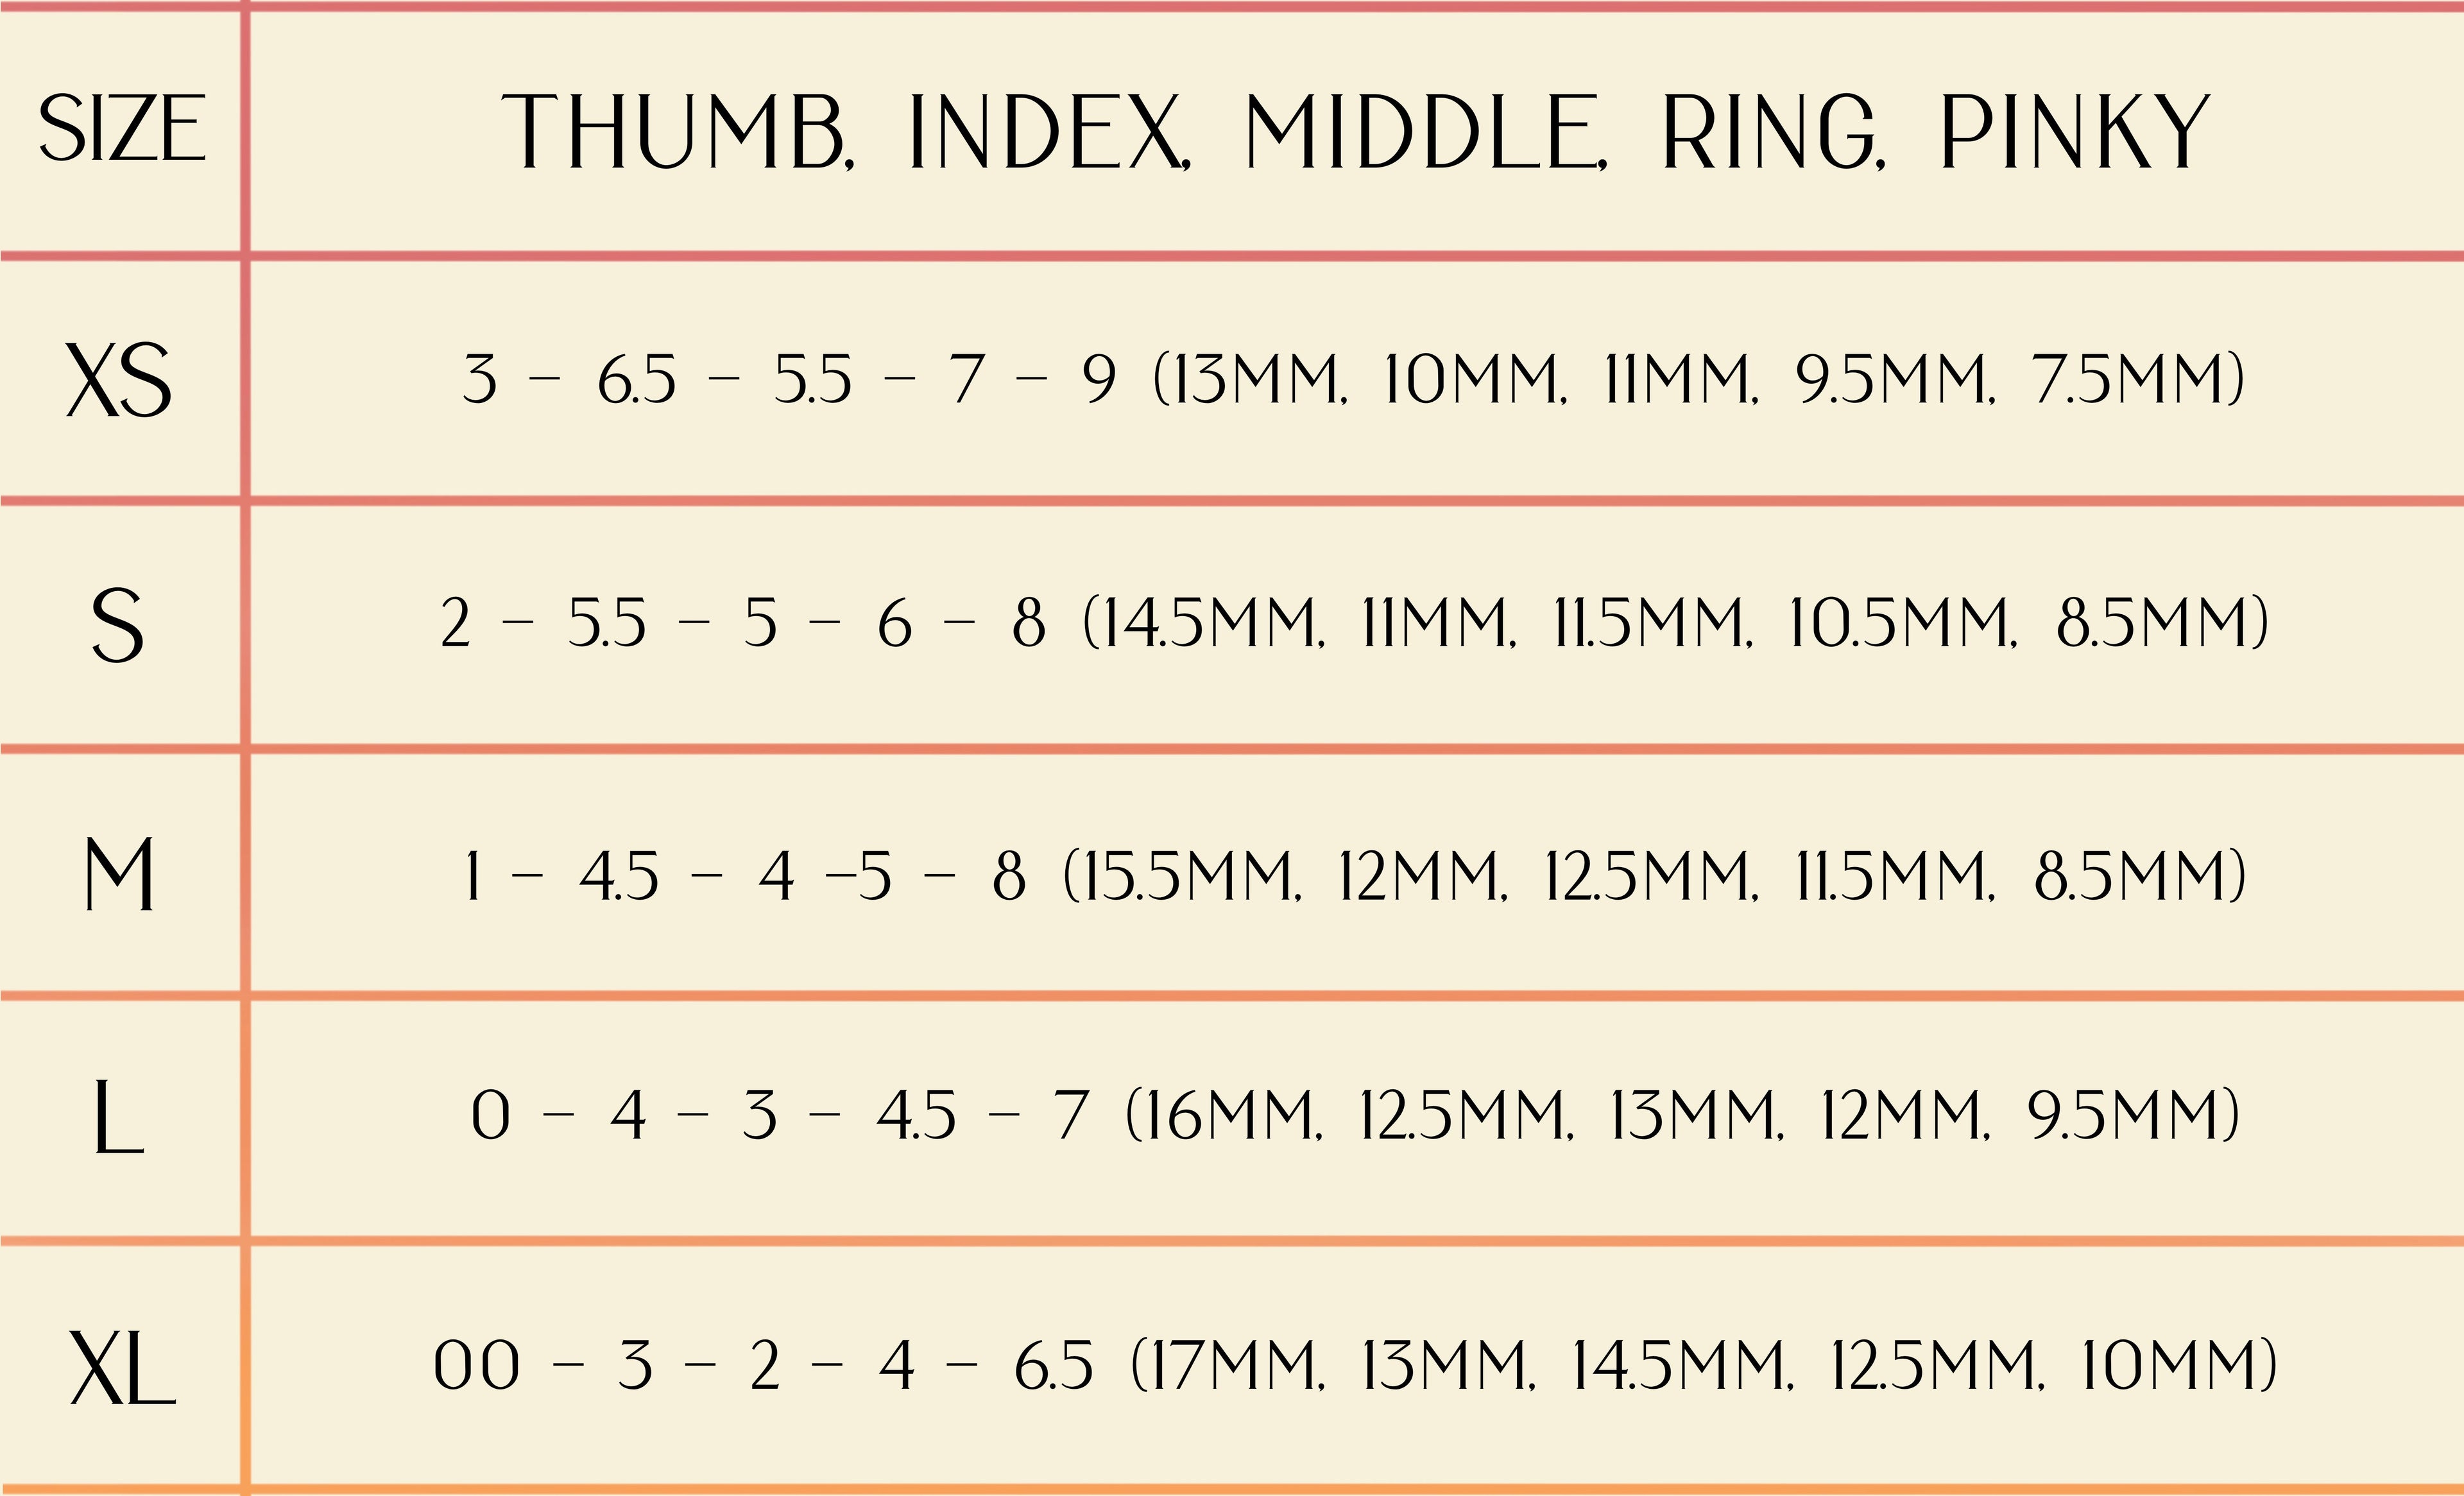
To measure your nails you will need a soft measuring tape, a pen, and scotch tape. Press a piece of tape down onto your nail bed. Using a pen, mark the edges of your nail bed against each sidewall. Remove the tape and place down on a flat surface. Use the soft measuring tape to measure the distance in millimeters between the two marks. Note the size of that nail and find your sizing by corresponding it to the chart below. Proceed with the same steps for all 10 nails. Once you have all 10 nails sized, use the next chart to determine whether you fit into any of the standard size options.
If you are between two sizes, choose the larger size.
If your measurements don’t fit into any one size or your hands are different sizes, select custom at checkout. Write down your sizes as so, 14.5mm, 11mm, 11.5mm, 10.5mm, 8.5mm or 2, 5.5, 5, 6, 8 (Thumb, index, middle, ring, pinky). Be sure to write your sizes for both hands if they differ.
What brand tips do we use for our nails?
The brand we use for all of our sets is Après natural nail tips. The term 'natural' refers to the C-curve shape of the tip, which is better suited for press-on nails than the sculpted option.
How many nails are provided?
All sets include 10 nails. Every set of nails is made to order.
Do we offer custom sets?
At the moment we do not offer custom sets. Although it is possible to be added on in the future. If you're interested in having custom sets available, please use the contact form to get in touch with us. If you are interested in changing something about a current set available, feel free to contact us!
Application & Removal
How do I apply/remove my press-on nails?
Instructions for applying and removing your set of nails with glue is located on the back of your card that displays your nails.
Although, if you would like more detailed instructions on how to apply keep reading.
How you prep your nails will make and break how long your press-ons last. Start be ensuring your nail beds are free of any products and your hands are clean and dry. Trim/file down your nails to a short but comfortable length. Next push back your cuticles using the provided orange wood stick. It's not necessary, but cutting away any dead cuticle or hang nails would also help. After pushing back all your cuticles take the square buffer to remove the shine from your nails. Another tip is to take the corner of that buffer and buff real close to your cuticle. Dead skin tends to stick to the nail bed and is the leading cause of product lifting. Once you're confident you've removed all the dead cuticle and the shine, take an alcohol prep pad and scrub your nails. Be sure to do this step thoroughly. you are provided with two prep pads, use one for each hand. Oil will keep your glue/adhesive pad from adhering to your nail beds. So make sure those nails look nice a dry before applying anything.
If you're using adhesive tabs simply apply a tab to the nail and then press your nail onto the pad. If you find your adhesive tabs aren't holding very well, try etching the back side of your press-on nail by filing it with the provided buffer/file.
For glue, apply a dot of glue to both your nail bed and the back of your press on nail. Not much is needed, just s small dot. Upscale the size of your dot for each nail that gets bigger. You'll want to start by lining up your nail at the cuticle and slowly and evenly press down from there. Make sure you nail straight and hold for 15-20 seconds. Use the orange wood stick to clean up any excess glue. Continue that process for all nails. I suggest waiting 12 hours before applying any cuticle oil or lotion.
Do we include glue or adhesive tabs?
Both glue and adhesive tabs are included with your purchase of any set of nails. Nail glue is recommended for a stronger and longer adhesion while adhesive tabs are a temporary 2-3 day wear.
Can I reuse my press-on nails?
Yes! your press on nails can be reused whether you use glue or adhesive tabs. Adhesive tabs may be more reusable friendly compared to glue. For glue gently buff or file the back of your press-on nail to remove any excess glue stuck to the nail.
Do we etch the backside of our press-on nails?
We do not etch the backside of our press-on nails. Although we do offer it upon request. If you would like your nail set pre-etched, simply ask for etched nails in the instruction box when checking out with your set of nails.
Shipping & Orders
How Long does processing and shipping take?
Processing takes 5-14 days and shipping can take 5-8 days depending on the location and shipping preference selected at checkout. Please understand that every set of nails is made to order and that you are ordering from a small business.
dO WE SHIP INTERNATIONALLY?
At the moment we do not ship internationally. We apologize for any inconvenience this has caused.
what is our return/exchange policy?
Unfortunately we do not accept returns on any sets of nails. All sales are final and for this reason please be sure to double check your order and sizes before checking out. If you do have an issue with your order please use the contact form on the website to let us know if you have any issues with our products within 2 weeks of delivery.
What happens if my order gets lost?
Once the order has been shipped it is out of our control what happens to the package. If you encounter any issues please contact the shipping carrier that was responsible for delivering your package.